python:qiskit:インストール
概要
Qiskit 1.1を入れた記録。
- 環境: Ubuntu 22.04
- プログラム実行にはJupyterLabを使用
手順
今回はインストールにはPIPを使います。
$ sudo apt update
$ sudo apt upgrade
$ sudo apt install python3-pip
Qiskitはバージョンによって頻繁に文法が変わるので、仮想環境の中にインストールしてバージョンごとに使い分けるのがおすすめです。 仮想環境の作成にはvenvを使います。
$ sudo apt install python3-venv
Qiskitの導入
- 仮想環境を作成します(ここではホームディレクトリに qiskit-1.1-venv というディレクトリを作り、その中に仮想環境を構築します)
$ python3 -m venv ~/qiskit-1.1-venv
- 作成した仮想環境が必要なくなったら、このディレクトリを削除すればよいです
- 仮想環境を有効化します。
$ source ~/qiskit-1.1-venv/bin/activate
- 仮想環境が有効化されているときは、コマンドラインの先頭に (qiskit-1.1-venv) のように表示されます
- 仮想環境を終了するには以下のコマンドを使用します。
(qiskit-1.1-venv) $ deactivate
- Qiskitと、その他必要なものを入れます。
(qiskit-1.1-venv) $ pip install qiskit qiskit-ibm-runtime qiskit-aer jupyterlab pandas matplotlib pylatexenc
- ちなみに、現在入っているパッケージやそのバージョンは次のように確認できます。
(qiskit-1.1-venv) $ pip freeze
WSLの場合
WindowsのブラウザでWSLで起動したJupyter Labが開くようにします。
- 設定ファイルを作成します。
(qiskit-1.1-venv) $ jupyter-lab --generate-config
- 設定ファイルを開きます
(qiskit-1.1-venv) $ vi ~/.jupyter/jupyter_lab_config.py
- 以下の文を追加します。
# c.ServerApp.use_redirect_file = True
c.ServerApp.use_redirect_file = False

# c.ServerApp.browser = ''
c.ServerApp.browser = '/mnt/c/Program\ Files\ \(x86\)/Microsoft/Edge/Application/msedge.exe %s'
サンプルプログラム
Qiskitを実際に動かしてみます。 仮想環境のJupyter Labを起動しましょう
(qiskit-1.1-venv) $ jupyter-lab
- ブラウザが自動的に開き、Jupyter Labが実行されます。
- 終了は、コマンドラインで Ctrl+c です。
新しいノートブックを作成して、以下を実行してください。
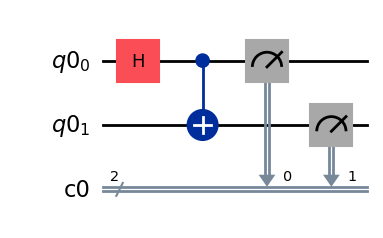
#Qiskitを呼び出します。
from qiskit import *

#量子レジスタと古典レジスタをそれぞれ2ビットずつ作成します
qr=QuantumRegister(2)
cr=ClassicalRegister(2)
circuit=QuantumCircuit(qr,cr)

#(1) 0番目の量子レジスタにアダマールゲートを作用させたあと、
#(2) 0番目の量子レジスタを制御ビットとするCNOTゲートを1番目の量子レジスタに作用させ、
#(3) 最後に測定を行う
#という量子回路を作成します
circuit.h(qr[0])
circuit.cx(qr[0], qr[1])
circuit.measure(qr,cr)

#Matplotlibで量子回路をプロットしてみます
circuit.draw(output='mpl')
コードは [Shift]+[Enter] を押すと実行されます。 うまくいっていれば、量子回路が表示されるはずです。
python/qiskit/インストール.txt · Last modified: 2024/10/07 03:20 by koudai